Ramón the Armadillo Amigurumi Crochet Free Pattern
Designer: Carla Mitrani
Instagram: @amourfou_crochet
Etsy Store: AmourFouCrochet
Hello everyone…
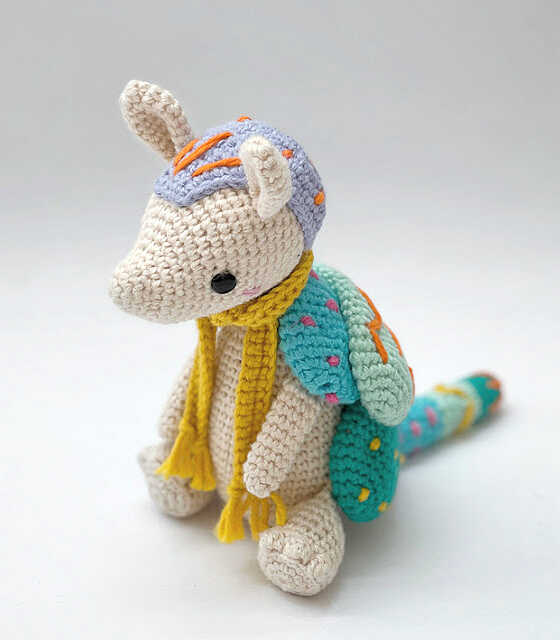
One of the free amigurumi crochet patterns we will share today is the amigurumi Ramón the Armadillo, whose photos and design belong to Amour Fou. You can learn how to crochet these armodillo the free amigurumi pattern. Thanks to Carla Mitrani for this cute armadillo.

Below you will find some information about this pattern. Remember, if you have any problems, you can write to us and ask for help. You can follow our Pinterest account for free amigurumi patterns and great amigurumi ideas. Have fun…
Amigurumi cats, amigurumi dolls, amigurumi dogs, amigurumi unicorns, amigurumi lambs, amigurumi dinosaurs, amigurumi foxes, amigurumi bears, amigurumi giraffes, amigurumi pigs, amigurumi birds, amigurumi penguins, amigurumi panda, amigurumi llama, amigurumi bunny, amigurumi clowns, amigurumi elephants, amigurumi hippos, amigurumi monkeys… All the amigurumi toys crochet pattern tutorials and ideas you are looking for are here…
Finished size: If crocheted with a 2.00 mm hook, Ramón should measure 12 cm approximately. Of course, should you choose a different hook and yarn, the final size will vary…
Materials
– 2.00 mm crochet hook
– 100 % cotton yarn for a 2.00 mm hook
– A pair of 6 mm safety eyes
– Tapestry needle
– Polyfiber fill
Colors
– Beige or cream for the body
– 5 different colors (4 for his colorful plaques, 1 matching color for his scarf.)
– Leftovers of different colors to decorate your Ramón as a Mexican ‘alebrije’.
Abbreviations
st = stitch
ch = chain
slst = slip stitch
sc = single crochet
Special stitch: Bobble Stitch
In the next stitch, make 5 double crochet, keeping the last loop of each stitch on the hook (you’ll need 5 unfinished double crochets). Then slip stitch into all the 6 loops on the hook. Continue with the following sc stitches.
AMIGURUMI ARMADILLO FREE PATTERN
Head
Using beige or cream…
1. Magic ring of 6 sc
2. Crochet *2 sc in each st*, repeat * (12)
3. to 4. Crochet 1 sc in each stitch (12)
5. Crochet *1 sc, 2 sc in the next st (increase)*, repeat * (18)
6. Crochet 8 sc, 1 increase in the next 2 stitches and, finally, 8 sc (20)
7. Crochet 9 sc, *1 increase in the next sitch, 1 sc in the following stitch*, repeat * twice and, finally, 7 sc (22)
8. Crochet 10 sc, 1 increase in the next sitch, 1 sc in the following 2 stitches, 1 increase in the next stitch, and then 8 sc (24)
9. Crochet 7 sc, *1 increase in the next sitch, 1 sc in the following stitch *, repeat * twice, 1 increase in the next stitch, *1 sc in the following stitch, 1 increase in the next stitch*, repeat * 3 times and, finally, 6 sc (30)
10. Crochet 1 sc in each stitch (30)
11. Crochet 8 sc, *1 increase in the next stitch, 1 sc in the following 2 stitches*, repeat * twice, 1 increase in the next stitch, *1 sc in the following 2 stitches, 1 increase in the next stitch*, repeat * 3 times and, finally, 6 sc (36).
Place safety eyes between rounds 11 and 12 and embroider the cheeks with a bit of pink yarn.
12. to 20. Crochet 1 sc in each stitch (36)
21. Crochet *4 sc, one decrease*, repeat * (30)
Start stuffing…
22. Crochet *3 sc, one decrease*, repeat * (24)
23. Crochet *2 sc, one decrease*, repeat * (18)
Stuff some more…
24. Crochet *1 sc, one decrease*, repeat * (12)
25. Crochet 6 decreases (6)
Fasten off yarn and weave in ends.
Body
Using beige or cream…
1. Magic ring of 6 sc
2. Crochet 2 sc in each st (12)
3. Crochet 2 sc in each st (24)
4. Crochet *3 sc, 2 sc in the next st*, repeat * (30)
5. Crochet *4 sc, 2 sc in the next st*, repeat * (36)
6. Crochet *5 sc, 2 sc in the next st*, repeat * (42)
7. to 15. Crochet 1 sc in each stitch (42)
16. Crochet *5 sc, one decrease*, repeat * (36)
17. a 19. Crochet 1 sc in each stitch (36)
20. Crochet *4 sc, one decrease*, repeat * (30)
21. a 23. Crochet 1 sc in each stitch (30)
Start stuffing…
24. Crochet *3 sc, one decrease*, repeat * (24)
25. and 26. Crochet 1 sc in each stitch (24)
27. Crochet *2 sc, one decrease*, repeat * (18)
28. and 29. Crochet 1 sc in each stitch (18)
Stuff some more…
30. Crochet *1 sc, one decrease*, repeat * (12)
31. and 32. Crochet 1 sc in each stitch (12)
Fasten off yarn, leaving a long tail to sew to the head.
Ears
Make two, using beige or cream…
1. Magic ring of 6 sc
2. Crochet 1 sc in each stitch (6)
3. Crochet 2 sc in each st (12)
4. to 9. Crochet 1 sc in each stitch (12)
No need to stuff…
10. Press the opening with your fingers and single crochet together both opposing sides. (6)
Fasten off yarn, leaving a long tail to sew the ears to the head.
Arms
Make two, using beige or cream…
1. Make 2 chain stitches. Crochet 4 sc in the second chain from hook (4).
2. Crochet 2 sc in each st (8)
3. to 11. Crochet 1 sc in each stitch (8)
No need to stuff the arms…
12, Press the opening with your fingers and single crochet together both opposing sides. (4)
Fasten off yarn, leaving a long tail to sew arms to the body.
Feet
Make two, using beige or cream…
1. Magic ring of 6 sc
2. Crochet 2 sc in each st (12)
3. Crochet *2 sc, 2 sc in the next st*, repeat * (16)
4. Only through back loops, crochet 1 sc in the first 5 sts, then *1 bobble stitch, 1 sc*, repeat * 3 times and, finally, 1 sc in the last 5 sts (16)
5. to 8. Crochet 1 sc in each stitch (16)
9. Crochet *2 sc, one decrease*, repeat * (12)
10. Crochet 1 sc in each stitch (12)
Stuff firmly…
11. Crochet 2 sc. Press the opening with your fingers and single crochet together both opposing sides (6)
Fasten off yarn, leaving a long tail to sew the feet to the body.
Body plaque 1
Using color 1…
1. Magic ring of 6 sc
2. Crochet 2 sc in each st (12)
3. Crochet *1 sc, 2 sc in the next st*, repeat * (18)
4. Crochet *2 sc, 2 sc in the next st*, repeat * (24)
5. to 21. Crochet 1 sc in each stitch (24)
No need to stuff.
22. Crochet *2 sc, one decrease*, repeat * (18)
23. Crochet *1 sc, one decrease*, repeat * (12)
24. Crochet 6 decreases (6)
Fasten off yarn, leaving a long tail to sew to the body.
Body plaque 2
Using color 2…
1. Magic ring of 6 sc
2. Crochet 2 sc in each st (12)
3. Crochet *1 sc, 2 sc in the next st*, repeat * (18)
4. Crochet *2 sc, 2 sc in the next st*, repeat * (24)
5. to 27. Crochet 1 sc in each stitch (24)
No need to stuff.
28. Crochet *2 sc, one decrease*, repeat * (18)
29. Crochet *1 sc, one decrease*, repeat * (12)
30. Crochet 6 decreases (6)
Fasten off yarn, leaving a long tail to sew to the body.
Body plaque 3
Using color 3…
1. Magic ring of 6 sc
2. Crochet 2 sc in each st (12)
3. Crochet *1 sc, 2 sc in the next st*, repeat * (18)
4. Crochet *2 sc, 2 sc in the next st*, repeat * (24)
5. to 31. Crochet 1 sc in each stitch (24)
No need to stuff.
32. Crochet *2 sc, one decrease*, repeat * (18)
33. Crochet *1 sc, one decrease*, repeat * (12)
34. Crochet 6 decreases (6)
Fasten off yarn, leaving a long tail to sew to the body.
Head plaque/Hood
Using color 4…
1. Magic ring of 6 sc
2. Crochet 2 sc in each st (12)
3. Crochet *1 sc, 2 sc in the next st*, repeat * (18)
4. Crochet *2 sc, 2 sc in the next st*, repeat * (24)
5. Crochet *3 sc, 2 sc in the next st*, repeat * (30)
6. Crochet *4 sc, 2 sc in the next st*, repeat * (36)
7. Crochet 1 sc in each stitch (36)
IMPORTANT! We will now stop crocheting in rounds and start crocheting in rows…
8. Crochet 1 sc in the first 10 stitches. Chain 1 and turn the piece.
9. Crochet 1 decrease, 1 sc in the next 6 stitches and, finally, another decrease (8). Chain 1 and turn the piece.
10. Crochet 1 decrease, 1 sc in the next 4 stitches and, finally, another decrease (6). Chain 1 and turn the piece.
11. Crochet 1 decrease, 1 sc in the next 2 stitches and, finally, another decrease (4). Chain 1 and turn the piece.
12. and 13. Crochet 1 sc in the next 4 stitches. Chain 1 and turn the piece.
14. Crochet 1 sc in the next 4 stitches
15. Crochet 1 sc all around the head plaque, first crocheting sc in between the spaces at the end of the rows on the forehead, then along the ‘hood’ and finally in between the spaces at the other end of the rows on the forehead.
Fasten off yarn, leaving a long tail to sew to the head.

Tail
Start with color 3…
1. Magic ring of 5 sc
2. Crochet 1 sc in each stitch (5)
3. Crochet 2 sc in each st (10)
4. and 5. Crochet 1 sc in each stitch (10)
6. Change to color 2 and, only through back loops, crochet 1 sc in each stitch (10)
7. to 10. Crochet 1 sc in each stitch (10)
Start stuffing the tail (but not firmly, just to give shape to it) and continue doing so as you crochet…
11. Change to color 3 and, only through back loops, crochet 1 sc in each stitch (10)
12. to 15. Crochet 1 sc in each stitch (10)
16. Change to color 4 and, only through back loops, crochet 1 sc in each stitch (10)
17. to 19. Crochet 1 sc in each stitch (10)
20, Press the opening with your fingers and single crochet together both opposing sides. (5)
Fasten off yarn, leaving a long tail to sew the tail to the body
Scarf
The scarf is worked in rows. Using the color of your choice…
1. Crochet 61 ch stitches. Starting in the second ch from hook, crochet 1 sc in each ch stitch (60). Chain 1 and turn.
2. Only through back loops, crochet 1 sc in each st.
Fasten off and weave in ends. Make a tiny fringe to the scarf by tying short pieces of yarn to the ends.
Assembly
– Sew the Head Plaque/Hood to the head.
– Curve the ears and sew them to the head, over the head plaque.
– Using the remaining tail, sew the body to the base of the head.
– Sew the arms to the body.
– Sew the feet to the body, in a sitting position.
– Sew the tail to the back of the body.
– Flatten the body plaques and curve them. Now sew the first place surrounding the neck and the third plaque covering the tail. Then sew the second plaque over the first and third one, partly covering them.
– Using leftovers of different colors embroider dots and dashes to decorate the plaques of your Ramón as a Mexican ‘alebrije’. Just have fun!
– Surround Ramón’s neck with the scarf.
That’s it! You are done!
More amigurumi armadillo ideas:


