Crochet Airplane Amigurumi Free Pattern
Designer: Irina Rybolovleva
Instagram: @irina_rybolovleva
Hello everyone…
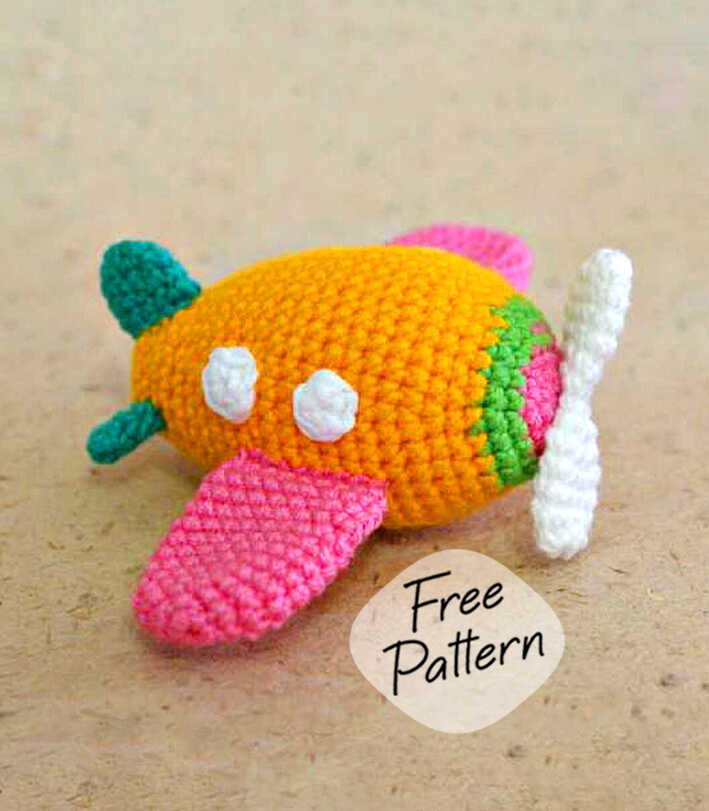
One of the free amigurumi crochet patterns we will share today is the amigurumi airplane, whose design belong to Irina Rybolovleva (VK). You can learn how to crochet these airplane the free amigurumi pattern. Thanks to Irina Rybolovleva for this cute plane.

Below you will find some information about this pattern. Remember, if you have any problems, you can write to us and ask for help. You can follow our Pinterest account for free amigurumi patterns and great amigurumi ideas. Have fun…
Amigurumi cats, amigurumi dolls, amigurumi dogs, amigurumi unicorns, amigurumi lambs, amigurumi dinosaurs, amigurumi foxes, amigurumi bears, amigurumi giraffes, amigurumi pigs, amigurumi birds, amigurumi penguins, amigurumi panda, amigurumi llama, amigurumi bunny, amigurumi clowns, amigurumi elephants, amigurumi hippos, amigurumi monkeys… All the amigurumi toys pattern recipes and ideas you are looking for are here…
Materials
Vita Cotton (Soft Cotton) yarn in various colors.
Filler holofaber, sintepon
Sewing needle
Abbreviations
R = row
mc = magic circle
ch = chain
sc = single crochet
hdc = half double crochet
sl st = slip stitch
inc = increase (2 sc in one st)
dec = decrease (2 sc together)
BLO = back loop only
FLO = front loop only
F.o. = finish off
(…) = repeat the instructions in brackets the given number of times
[…] = number of stitches you should have at the end of the round/row
Note: Parts are knitted in a spiral, unless otherwise indicated.
You can knit from any yarn. The main thing is to choose the right size of the hook so as not holes could be seen through the knitted fabric. To do this, take a smaller hook, than indicated on the yarn label.
Mark the beginning of each row with a marker, pin, or string in a contrasting color.
AMIGURUMI AIRPLANE CROCHET FREE PATTERN
Airframe
Pink color

1 row 6 sc in mc
2 row (inc) * 6 (12)
3 row (1 sc, p) * 6 (18)
Change the color to green

4 row (2 sc, inc) * 6 (24)
5 row 24 sc (24)
Change the color to yellow

6 row (3 sc, inc) * 6 (30)
7 row 30 sb (30)
8 row (4 sc, inc) * 6 (36)
9 row – 15 row (7 rows) 36 sb (36)
16 row (4 sc, dec) * 6 (30)
17 row – 19 row (3 rows) 30 sc (30)
20 row (3 sc, dec) * 6 (24)
21 row – 23 row 24 sc (24)

24 row (2 sc, dec) * 6 (18)
25 row – 26 row (2 row) 18 sc (18)
27 row (1 sc, dec) * 6 (12)
28 row (dec) * 6 (6)

Add filler, close the remaining loops, hide the thread
Propeller

1 row 5 sc in mc
2 row (inc) * 5 (10)
3 row – 6 row (4 rows) 10 sb (10)
7 row (dec) * 5 (5)
8 row – 9 row 5 sc (5)
10 row (inc) * 5 (10)
11 row – 14 row (4 rows) 10 sb (10)
15 row (dec) * 5 (5)
Close the remaining loops, hide the thread
Portholes (windows) (4 parts)

8 sc in a mc.

Leave a thread for sewing
Wing (2 parts)
1 row 6 sc in mc
2 row (inc) * 6 (12)
3 row (1 sc, inc) * 6 (18)
4 row – 11 row (8 rows) 18 sc (18)
Leave the thread for sewing
Tail

Big detail
1 row 6 sc in mc
2 row (2 sc, inc) * 2 (8)
3 row (3 sc, inc) * 2 (10)
4 row – 5 row (2 rows) 10 sb (10)
Leave the thread for sewing
2 small details
1 row 6 sc in mc
2 row – 3 row (2 rows) 6 sc (6)
Leave the thread for sewing

Assembly
Place the wings to the body at an equal distance from each other, sew with a secret seam. Portholes are above the wings. Try on the tail and sew it on. Propeller we place it in the center.

That’s all! Our airplane is ready to fly
